M‑VAVE FM‑1 · Firmware v0.9.8
White Rabbit manual.
Start with a pattern, then jump to the feature you want to try.
Jump to a subject
Make your first pattern
A new song opens with pattern 01 on track 1. Start there.
- Pick a sound. In Song, turn PRESETS and try the keys. If you already have a song open, use Projects → New Project first.
- Enter a phrase. Press SEQ, then REC. Play and release four notes one at a time. The cursor advances after each release. Turn SELECT to leave gaps.
- Hear the loop. Press REC to disarm, then PLAY to listen. Stop and press SAVE to keep it.
Rather hear a full track? Hold HOME and tap SAVE. Choose Factory Demo with SELECT, press SEL, then PLAY.
Panel buttons and knobs
Know the controls
- SELECT knob and SEL button
- Turn SELECT to move between rows. Press SEL to confirm a menu choice or mark items in a grid.
- K1–K4
- The four parameter knobs edit the highlighted row or track bank. Match the knobs to the columns from left to right. Turn slowly for precise changes and faster to move through continuous values.
- ALGORITHM and PRESETS
- ALGORITHM, called ALGO on screen, adjusts the control for the open view. PRESETS browses sounds. Hold SEL and turn PRESETS to jump between sound categories.
- HOME, SEQ, EDIT
- HOME opens Song, SEQ opens the pattern editor and EDIT opens the instrument editor.
- ENV, GLO, FX, LFO, ARP
- ENV opens actions for the current view. GLO opens the mixer, FX opens effects or commands, LFO opens Perform, and ARP opens Chords and arpeggiator settings.
- OCT−, OCT+
- Shift the physical keyboard down or up an octave.
In menus, turn SELECT to choose an item. Press SEL or turn ALGO clockwise to run an action. Where an item shows a value, turn ALGO to change it.
Arrange patterns in Song
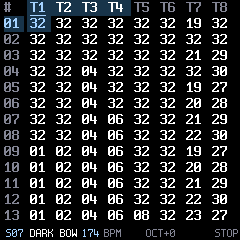
Each column is a track, and each number links to a pattern. A new pattern starts at 16 steps.
- Press HOME to open Song. Turn SELECT to choose a row.
- Turn K1–K4 to set the pattern numbers on the four highlighted tracks. Press HOME again to switch between tracks 1–4 and 5–8. Turn the track knob back down to -- to empty that cell.
- Press SEQ to open the pattern in the focused cell. On an empty cell, SEQ opens the last pattern you visited, or pattern 01 if you haven’t opened one. To create and link a new pattern on an empty cell, stop playback, focus the cell and press REC.
Turn ALGO in Song to set the tempo from 40 to 240 BPM. Press PLAY to start on the selected row. While the song is running, move to another row and press PLAY to jump there. Press PLAY on the row where you started or last jumped to stop.
Start on a row with a pattern for each track you want to hear. Each track advances when its pattern ends. Fill consecutive cells to play them in order. A gap or the end of Song loops the run. From Song, use ENV → Play Once to stop each track at the end of its run. Count-In adds a bar before Song playback.
Insert, repeat, or vary a row
Repeat a section or make a variation
- Insert Row
- From Song, press ENV and choose Insert Row to place an empty row above the current one.
- Repeat Row
- Choose Repeat Row to place the same pattern links on the next row. Both rows use the same underlying patterns.
- Make Variation
- Focus a filled cell, then choose ENV → Make Variation. White Rabbit copies its pattern into a free slot and points that cell to the copy. Press SEQ to edit the copy while keeping the original pattern available elsewhere.
Edit notes and timing in Sequence
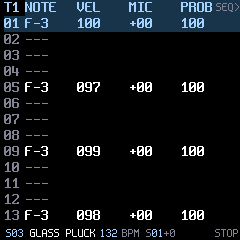
Press SEQ to edit a pattern. Turn SELECT to move between steps and ALGO to browse patterns. With playback stopped, play a key to write a note.
Tap SEQ again to switch between the two pages below. To hear only the selected pattern, press PLAY from Sequence.
| Knob | Notes page | Details page |
|---|---|---|
| K1 | NOTE sets the pitch. | NOTE sets the pitch. |
| K2 | VEL sets velocity from 1–100. | INST chooses the instrument for this step. |
| K3 | MIC shifts the note by −12 to +12 ticks. Negative is early and positive is late. A step has 24 ticks. | RT sets 1–8 hits per step. Use more hits for a ratchet. |
| K4 | PROB sets the chance of playing the step from 0–100%. | GATE sets note length up to 96 ticks. At 0 the display reads HOLD, which sustains a pitched note until the next note or a note-off. |
On the Details page, a dim instrument name means the step follows the track’s sound. Turn K2 to open the step’s sound list, then turn K2 or PRESETS to browse. Press SEL or turn ALGO right to assign it. Play a key to audition and close the picker. An assignment on an empty step sets the sound for the next note you enter. To apply a sound you have already chosen to the current note, use ENV → Use Active Sound.
To keep playback visible, press ENV, choose Follow Playback with SELECT and press SEL. Song follows the selected track’s playing row. Sequence follows steps inside the sequence you opened. Turning SELECT or a setting knob pauses following for editing. Press PLAY to start the selected Song row and resume following. While playing, choose another Song row and press PLAY to jump there; press PLAY on the same start row to stop. Moving the editing cursor alone leaves playback running. Choosing OFF in this menu keeps following off through playback starts. Song and Sequence each have their own setting, initially on.
To set a shorter or longer pattern, stop playback, press ENV, select Length and turn ALGO. Press SEL to close the menu. To release a sustained note at a specific moment, select an empty step and turn K1 left to enter a note-off.
Record one step at a time or play live
Step recording
- Stop playback and open the destination pattern with SEQ. Use SELECT to choose the first step.
- Press REC. The screen shows REC STEP.
- Play and release a note to write it and advance. Use SELECT to skip steps or revisit a step.
- Press REC again to disarm. Use the Notes and Details pages to adjust the result.
Live recording
- In Song, focus a track with a pattern on the current row, then press PLAY.
- Press REC to follow that track’s playhead. REC LIVE means it has a current step. REC WAIT means there is no active step to record into.
- Play along. Notes go on the active step and take their length from your key holds. Recording follows the track across patterns. Your notes join the pattern on its next pass.
- Press REC again to disarm. Stop playback before saving the result.
Select, copy, clear and undo
- Mark steps
- In Sequence or Commands, tap SEL to mark the current step. Use SELECT to move and mark more steps. Hold SEL while turning SELECT to mark a range. After marking a step, use ENV → Select All to mark the whole active pattern.
- Mark Song cells
- Tap SEL to mark the focused cell. Hold SEL and turn one of K1–K4 to mark the corresponding track on the current row.
- Copy and paste
- On a Sequence note page, mark one or more steps and choose ENV → Copy Step or Copy Steps. Move to the destination step and choose Paste Step or Paste Steps. The paste begins at the cursor and keeps gaps between the copied steps.
- Delete or clear
- The ENV menu offers Delete Cell for Song links, Delete Step for marked notes and their settings, and Delete Commands on Commands. To wipe a pattern while keeping its length and Song links, clear any selection with Deselect, then choose Clear Pattern from a Sequence note page. This also clears steps beyond a shortened pattern’s active length.
- Undo and redo
- Choose ENV → Undo to reverse the most recent supported edit, or Redo to reapply it. A new edit replaces the previous undo history.
Choose and shape a sound
- Turn PRESETS and play the keys to audition. Hold SEL while turning PRESETS to jump between Analog, FM, Chiptune, Drum Kits and Drum Synths.
- Press EDIT to open the current sound. Turn SELECT to choose a row and use K1–K4 for its controls. Press EDIT again to return.
- Use the Sequence Details page to set an instrument for just one note.
All 69 factory sounds are available in every song. Editing, copying and importing use the song’s 16 custom slots, S01–S16. In the instrument editor, ENV opens Init Sound, Copy Sound and Replace Slot. Confirm Replace Slot only when you want to change every note that uses that slot.
What you can edit in each synth
- Analog
- Basses, acid, stabs, pads and leads. On the first edit row, K1–K4 control cutoff, resonance, drive and filter mode. Use SELECT to reach the oscillators, tuning, envelopes and modulation.
- FM
- Six-operator basses, keys, bells, plucks, stabs, leads and pads. Turn ALGO to select an operator. On the Voice row, K1 changes the FM algorithm. The other rows cover cutoff, LFO, operator parameters and envelopes.
- Chiptune
- Pulse, stepped triangle, 4-bit waves and clocked noise. EDIT gives you waveform shape, stepped envelopes, pitch drops, chord arpeggios and tone controls.
- Drum Synths
- Individual kick, snare, closed hat, open hat, clap and tom patches. Each plays across the keyboard. Use EDIT to adjust tuning or clap spread, color, level and decay.
Play and swap drum kits
Jungle, Boom Bap, 808, 909 Techno and Electro share the same key layout in both banks, F3–E4 and F4–E5. From F, the keys play kick, alternate kick, snare, rim, clap, low tom, closed hat, percussion, high tom, shaker, open hat and cymbal in chromatic order.
Recording with a kit assigns it to the destination track. To swap the kit after you have made a beat, select the new kit, then choose Assign Active Kit in the Song or Sequence ENV menu. Use Kit Octave there to switch between the two banks. The existing rhythm and explicit step instruments stay in place.
On the synthesized 808, 909 Techno and Electro kits, press EDIT and play a key or turn ALGO to pick a hit. The Kit row sets overall level. The Hit row sets tune or clap spread, decay, character and level. On Model, you can make one hit use the corresponding voice from another synthesized kit.
Play chords and arpeggios
Chords
Press ARP to open Chords. Turn ALGO right to use chord keys and left to return to chromatic keys. SEL also toggles chord input on this page. The white keys from F through E play scale degrees I through VII. The screen shows the black-key secondary dominants and previews the pitches you play.
Use the first row to set Key, Scale, Shape and Inversion. Turn SELECT to the second row for Spread, Bass and Register. Drum kits still play their usual hits.
With chords on, play a key on either Sequence note page to enter the voicing. A step stores up to four pitches. If the played voicing has five pitches, the step keeps the four chord tones and drops the extra bass. A note such as C-4+2 adds two pitches to the displayed note. Turn K1 to transpose the entire voicing. A song can hold up to 96 chord steps.
Arpeggiator
Press ARP again to open its settings. Turn ALGO right to turn the arpeggiator on or left to turn it off. You can also hold ARP from another screen to toggle it. Use K1–K4 for order, rate, octave span and gate. Orders are Up, Down, Up/Down, Played and Random. The rate choices include eighth- and sixteenth-note triplets. Press SEL to latch the notes past key release.
With the arpeggiator on, enter a note or chord in Sequence to store an arp step. For a voicing of up to four held notes, arm step recording and release the last key to advance. A beside the note identifies an arp step. It keeps arpeggiating when live Arp is off and follows the song’s current arpeggiator settings.
Mix tracks and route effects
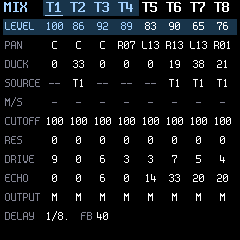
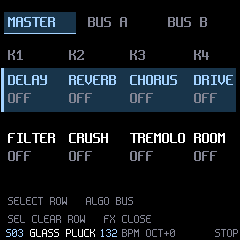
Press GLO to open the mixer. Turn SELECT to choose a row. K1–K4 control the highlighted four tracks. Press GLO again to switch between tracks 1–4 and 5–8.
Mixer rows and controls
- Level and Pan
- Set each track’s volume and position in the stereo mix.
- Duck and Source
- Set the amount of volume reduction on the track you want to duck, then choose another track as its trigger source.
- M/S
- On the Mute/Solo row, turn a track’s knob left from normal to mute or right to solo. You can solo several tracks. SEL toggles mute on the underlined track.
- Cutoff, Res and Drive
- Shape a track’s tone with its filter cutoff, resonance and saturation.
- Echo and Delay
- Echo sends an individual track to the shared delay. On the Delay row, K1 chooses the tempo division and K2 sets feedback.
- Output
- Route the track to Master, Bus A or Bus B. New tracks start on Master.
Master and bus effects
From Song, press FX to open the effects screen. Turn ALGO to switch between Master, Bus A and Bus B. Turn SELECT to choose a row and use the four track knobs to set it.
- The top row offers Delay, Reverb, Chorus and Drive. This row and the mixer routing save with the song.
- The bottom row offers Filter, Crush, Tremolo and Room. These live settings reset when you load or start a song. Turn Filter left from Off for low-pass or right for high-pass.
Bus A and B process their assigned tracks before they reach Master. Master affects the combined mix. Press SEL to clear the selected row or FX to close the screen.
Try it. Route a pad and a lead to Bus A, leave the drums on Master, then raise Reverb on Bus A. Press HOME to return to Song from the mixer.
Program effects on steps
- From Sequence, press FX to open Commands. Press FX to switch between the A/B and C/D banks. Each step can hold four commands.
- Turn SELECT to the step. Turn K1 or K3 to open a command picker. Browse with SELECT or the same knob, then press SEL or turn ALGO right to confirm. The picker closes after roughly a second of inactivity and discards an unconfirmed change.
- Use K2 or K4 to set the value for the command to its left. Press SEQ to return to the note page.
Command names and values
- ARP and PITCH
- ARP plays a stored note or chord through the song’s arpeggiator. Choose Song in its value to use the song rate or pick a rate for this step. PITCH cycles through the note, the chosen semitone offset and a fifth.
- GLIDE and CUT
- Glide slides into a new pitch over 1–96 ticks. For a bass slide, put Gate 0 on the preceding note and add Glide to the destination note. Cut releases a note at tick 0–23 of the step.
- ROLL and EVERY
- Roll changes the velocity from hit to hit when a note has ratchets. Every makes the note play once every 2–16 pattern passes.
- CUTOFF and TRACK ECHO
- Cutoff sets the track filter for the step. Track Echo sets that track’s delay send.
- CLEAR
- Empties the current command slot. To clear all four commands on several steps while keeping the notes, mark the steps and choose Delete Commands in ENV.
The picker also has all 27 Perform effects. Set the amount with its value knob. Hold SEL while turning that knob to set a duration of 1–16 steps. The small number shows the duration. Dial in the effect’s other settings in Perform. If effects trigger together, slot D has priority over C, B and A. Across tracks, the lowest-numbered audible track wins.
Perform and record live effects
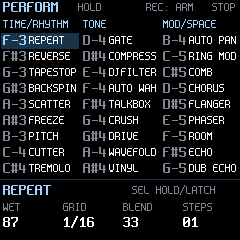
Press LFO to open Perform. Each of the 27 keys triggers a different effect on the stereo mix. In Hold mode, the effect lasts until you release the key. If you hold a second key, its effect takes over until you release it. Press SEL for Latch mode and tap the active key again to release it. Press LFO to close Perform.
SELECT browses effects for editing without triggering them. K1 sets the wet amount, K2 and K3 edit the two settings shown for the effect, and K4 sets its recorded duration in sixteenth-note steps. Let audio play briefly before using a capture effect such as Repeat or Reverse.
Look up each effect’s controls
| Key and effect | K2 | K3 |
|---|---|---|
| F3 Repeat | Grid | Blend |
| F♯3 Reverse | Grid | Blend |
| G3 Tape Stop | Time | Brake |
| G♯3 Backspin | Time | Acceleration |
| A3 Scatter | Grid | Gate |
| A♯3 Freeze | Grain | Motion |
| B3 Pitch | Shift | Grain |
| C4 Cutter | Grid | Duty |
| C♯4 Tremolo | Speed | Depth |
| D4 Gate | Release | Threshold |
| D♯4 Compressor | Release | Threshold |
| E4 DJ Filter | Resonance | Low-pass / high-pass |
| F4 Auto Wah | Release | Sensitivity |
| F♯4 Talkbox | Resonance | Vowel |
| G4 Crush | Hold | Bits |
| G♯4 Drive | Gain | Tone |
| A4 Wavefold | Gain | Bias |
| A♯4 Vinyl | Wow | Wear |
| B4 Auto Pan | Speed | Depth |
| C5 Ring Mod | Frequency | Wave |
| C♯5 Comb | Length | Feedback |
| D5 Chorus | Speed | Depth |
| D♯5 Flanger | Speed | Depth |
| E5 Phaser | Speed | Depth |
| F5 Room | Size | Decay |
| F♯5 Echo | Grid | Blend |
| G5 Dub Echo | Grid | Blend |
To record FX, open a pattern and press LFO, then REC. While stopped, each press writes an effect and advances one step. While playing, hold or latch an effect to record it along the track. REC WAIT means there’s no active step. Edit the result in Commands.
Try it. Start a loop, tap LFO, then hold F3 for a quick Repeat. Release on the next beat to return to the mix.
Save and manage songs
Check your firmware version: hold HOME and press SAVE. The version is in the top-right corner of the Projects menu.
Stop playback, hold HOME, then press SAVE to open Projects. Turn SELECT to choose a row. For Open Project, Save and Save Copy, turn ALGO to pick slot 1–4 and press SEL to confirm.
Project menu, demo, and backlight
- New Project
- Starts a fresh song with pattern 01 in the first cell. Press SEL to start.
- Open Project
- Loads a song from the selected slot.
- Save
- Stores the working song in the selected slot. Outside Projects, SAVE updates the current slot or uses the first free slot for a new song.
- Save Copy
- Choose another slot to keep an earlier version. If that destination already holds a song, the screen asks you to press SEL again before it replaces the song.
- Factory Demo
- Opens Night Signal, a 64-bar drum and bass track at 174 BPM. Press PLAY to hear it. Jump to row 17 for the first drop, row 33 for the breakdown or row 41 for the second drop.
- Backlight
- Turn ALGO to choose Off, Buttons or All. The setting saves when playback stops.
- Numbers
- Turn ALGO right for Hex or left for Decimal (the default). Tracker numbers change notation, for example 16 becomes 10 in hex. Note names and BPM keep their normal form. The choice saves while stopped and stays with the device across songs and restarts.
When you switch away from a changed song, choose Cancel, Save & Continue or Discard Changes with SELECT, then press SEL. The working song also saves while stopped and idle. After editing, wait for READY or press SAVE and wait for SAVED before switching off. On the next power-up, White Rabbit restores the most recent working song.
Record audio, use MIDI and back up
Record the stereo mix
- Connect the FM‑1 to your computer with a USB data cable.
- Choose White Rabbit FM‑1 as your input in your recorder or DAW. Arm a stereo track and play a few notes to check its meters.
- Record at 44.1 kHz. The FM‑1 supplies 16-bit stereo. Balance the recording in the mixer. Use the physical MASTER knob for speaker or headphone volume.
To record a video in Final Cut Camera, connect a USB‑C iPhone with a data cable. For Lightning, use a Lightning to USB 3 Camera Adapter and a USB‑A to USB‑C data cable. In the app, open Settings → Audio → Input Source, choose White Rabbit FM‑1 and check the camera meters. Apple’s audio input guide
Send and receive USB MIDI
Choose White Rabbit FM‑1 as a MIDI device in your DAW. Incoming notes play with their incoming pitch and velocity. The FM‑1 keys transmit on channel 16. Sequencer tracks 1–8 transmit on channels 1–8, including ratchets and note-offs. Muting a track also mutes its sequenced MIDI output.
Back up individual songs, instruments, and DX7 patches
Back up songs and transfer sounds
Keep a full-flash backup on your computer using M‑Flasher. White Rabbit also supports individual transfers over USB MIDI with the fm1_project.py helper from the source checkout. Stop playback before a transfer.
- Song backup. Export the working song as a
.ptf1file. Importing one opens it as the working song. Open a saved slot first if that is the version you want to export. - Instrument backup. Export a custom slot as a
.wrifile, then import it into a custom slot in another song. Pick an empty slot to keep the sounds already in use. - DX7 patches. Import a DX7 single voice or pick one voice from a bank dump into a custom FM slot.
Install or update the firmware
White Rabbit v0.9.8 (build 115862F2) is for the M‑VAVE FM‑1. The package accepts both known flash IDs, Puya 0x856014 and UC25HQ80 0xB36014. Before changing firmware, keep a full-flash backup of your own unit so you can later restore its original state.
Use the browser installer in desktop Chrome, Edge, Firefox, or Safari for Mac with the Web MIDI extension. The installer explains the setup for each browser. To install with M‑Flasher, follow the steps below.
- On the White Rabbit page, open Download and choose M‑VAVE FM‑1. The v0.9.8 file is
White-Rabbit-v0.9.8.fm1.fwsc. - Connect the FM‑1 to your computer with a USB data cable. Open M‑Flasher and choose Download Mode. If you already have m-bootloader, you can also hold REC while switching on.
- Choose Backup Full Flash and save the backup on your computer.
- Choose Flash Firmware, select the White Rabbit
.fwscand review the write. Keep the unit connected until M‑Flasher verifies it. - Power-cycle the unit. The Moonlit Burrow image appears, then the Song grid opens. To return to a previous firmware and its data, use M‑Flasher’s full-flash restore and your own backup.
Install checklist and SHA‑256 checksum · M‑Flasher downloads and setup
Troubleshooting and limits
- Play starts but I hear nothing
- Check that the Song cell points to a pattern with notes. Press GLO and check Level and Mute/Solo. Check the physical volume if you are listening on the speaker or headphones.
- Some drum keys are silent
- Kits use two banks from F3 through E5. Use OCT− or OCT+ to return to a kit’s playable range.
- I cannot save or switch songs
- Stop playback, release any keys and try again. If all four slots hold songs, back up the one you want to keep before intentionally choosing a slot to replace.
- Clipped or missing USB audio
- Check that you selected the FM‑1 as a stereo input and that your cable carries data. If the recording meters clip, lower the track levels in the mixer and check the meters again.
- What fits in one song?
- Eight tracks, 64 Song rows, 32 distinct patterns with up to 64 steps each, and 16 custom instrument slots. Factory sounds can be used directly across a song. A song can hold up to 96 chord steps and 256 commands.
Include the firmware version and what you did just before the problem. Contact NoCompile Lab